
How to Reset RDS Grace Period on Windows Server 2016 and 2019
If you’re running a home lab or any testing environment, you might encounter challenges with licensing and trial expiration. Thankfully, there’s a “hack” that allows you to reset the expiration of Remote Desktop Services (RDS) grace period on Microsoft Windows Server, effectively rewinding the clock on your RDS licensing. This should only really be used if you’re using RDS in a lab environment. Completing the steps you see below guarantees that you reset RDS grace period without having to reinstall or re-creating any virtual machines.
When you install Windows Server 2016 or 2019, you have the default ability to have two sessions for administration purposes. However, by installing the Remote Desktop Services role, you can have multiple sessions on your server, similar to the legacy Terminal Server role in previous Windows versions.
Production vs. Testing Purposes
In a production environment, you’d have remote desktop license servers housing client access licenses and multiple session host server instances configured for hosting user sessions. But in a lab environment, you might not need to license this type of server outside of production, using a license server with a remote desktop session host.
After the 120-day grace period expires, you’ll encounter an error when trying to RDP to the server, indicating the need for a proper license due to the grace period expiring.
Resetting the 120-Day RDS Grace Period:
To reset the grace period, follow these three steps:
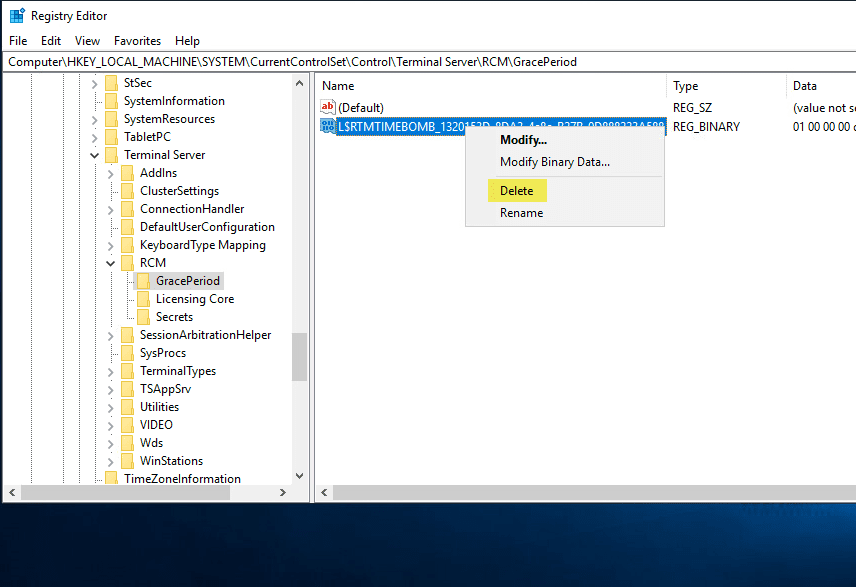
Step 1: Change Permissions on the RDS GracePeriod Key
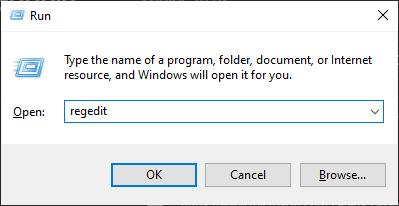
Open a command prompt and type “regedit” to access the registry editor.
Navigate to the following key location on your RDS server:
Computer\HKEY_LOCAL_MACHINE\SYSTEM\CurrentControlSet\Control\Terminal Server\RCM\GracePeriod
Right-click “GracePeriod” and select “Permissions.”
Since there are no default permissions on this key, you’ll need to take ownership of it first.
Click the “Advanced” button, then “Change” next to the Owner.
Choose the user or group you want to use to delete the registry key, and select the option to replace all child object permissions.
Step 2: Delete the “Timebomb”:
With the proper permissions set, right-click the “timebomb” value in the “GracePeriod” key and delete it.
The deletion of this registry key will essentially reset RDS grace period back to 120 days.
Step 3: Reboot the Server
After deleting the registry entry, simply reboot your server. Once it’s restarted, you’ll enjoy another 120-day grace period for your RDS server in the lab environment.
Resetting the 120-day RDS grace period on Windows Server 2016, 2019, and older versions like Windows Server 2012 and 2012 R2 is a straightforward process using this method to delete the timebomb registry key.
Keep in mind that this is not supported for production environments but is a handy trick for lab setups, saving you from having to redeploy Windows Server virtual machines to get a fresh 120-day grace period.
If you’re running into issues with licensing or managing your production servers, we’d be happy to help you resolve any outstanding issues.